画像内の「犬猫の品種」を検出するトレーニングをローカルで行う [Object Detection API]
TensorFlowのObject Detection APIの2番目のクイックスタートである
| Distributed Training on the Oxford-IIIT Pets Dataset on Google Cloud Google CloudでOxford-IIITペットデータセットの分散トレーニング |
を行います。ただし、Google Cloudは使用せずにローカルのGPUでモデルのトレーニングを行います。リンク先は英語ですが、出来る限り日本語で解説していきます。
前提条件
| 画像内の物体を検出するObject Detection APIの使用方法 |
の続きとなります。事前準備がありますので先にご覧ください。
※TensorFlow Modelsのインストール先は「/root/models」です。
1. 共有フォルダに専用フォルダを作成する
ホストOSとコンテナの「共有フォルダ」は次のようになっています。
/home/ユーザー名/tensor
[コンテナ側]
/foo
今回は/fooに「pets」フォルダを作成して使用します。
※コンテナ上の/fooは、実質的に/home/ユーザー名/tensorと同じです。
2. Oxford-IIITペットデータセットのダウンロード
cd /foo/pets

wget http://www.robots.ox.ac.uk/~vgg/data/pets/data/images.tar.gz

wget http://www.robots.ox.ac.uk/~vgg/data/pets/data/annotations.tar.gz

tar -xvf images.tar.gz

tar -xvf annotations.tar.gz
3. TFRecordファイルを作成する
Oxford-IIITペットデータセットのimagesとannotationsからTFRecordファイルを作成します。
cd /root/models/research/

export PYTHONPATH=$PYTHONPATH:`pwd`:`pwd`/slim

python object_detection/dataset_tools/create_pet_tf_record.py \
    --label_map_path=object_detection/data/pet_label_map.pbtxt \
    --data_dir=/foo/pets \
    --output_dir=/foo/pets
※このスクリプトを実行する際には、いくつかの警告が表示されます。
次にpet_label_map.pbtxtファイルをコピーしておきます。
cp object_detection/data/pet_label_map.pbtxt /foo/pets/pet_label_map.pbtxt
4. COCOの事前学習モデルをダウンロードする
cd /foo/pets

wget http://storage.googleapis.com/download.tensorflow.org/models/object_detection/faster_rcnn_resnet101_coco_11_06_2017.tar.gz
次にUbuntu側のユーザーで「/foo/pets/faster_rcnn_resnet101_coco_11_06_2017.tar.gz」を右クリックして「ここで展開する」を選択します。
そして、その「faster_rcnn_resnet101_coco_11_06_2017」フォルダにあるファイルを「/foo/pets」に移動します。その後、空の「faster_rcnn_resnet101_coco_11_06_2017」フォルダを削除します。
ここで/foo/petsのファイル構成は次のようになります。
[フォルダ]
annotations
images

[圧縮ファイル]
annotations.tar.gz
faster_rcnn_resnet101_coco_11_06_2017.tar.gz
images.tar.gz

[ファイル]
frozen_inference_graph.pb
graph.pbtxt
model.ckpt.data-00000-of-00001
model.ckpt.index
model.ckpt.meta
pet_faces_train.record-00000-of-00010
pet_faces_train.record-00001-of-00010
pet_faces_train.record-00002-of-00010
pet_faces_train.record-00003-of-00010
pet_faces_train.record-00004-of-00010
pet_faces_train.record-00005-of-00010
pet_faces_train.record-00006-of-00010
pet_faces_train.record-00007-of-00010
pet_faces_train.record-00008-of-00010
pet_faces_train.record-00009-of-00010
pet_faces_val.record-00000-of-00010
pet_faces_val.record-00001-of-00010
pet_faces_val.record-00002-of-00010
pet_faces_val.record-00003-of-00010
pet_faces_val.record-00004-of-00010
pet_faces_val.record-00005-of-00010
pet_faces_val.record-00006-of-00010
pet_faces_val.record-00007-of-00010
pet_faces_val.record-00008-of-00010
pet_faces_val.record-00009-of-00010
pet_label_map.pbtxt
5. Configファイルの設定
ファイルをコピーして文字列を置換します。
cp /root/models/research/object_detection/samples/configs/faster_rcnn_resnet101_pets.config /foo/pets/faster_rcnn_resnet101_pets.config

sed -i "s|PATH_TO_BE_CONFIGURED|/foo/pets|g" faster_rcnn_resnet101_pets.config
ファイルの中身は次のようになります。
[faster_rcnn_resnet101_pets.config]
# Faster R-CNN with Resnet-101 (v1) configured for the Oxford-IIIT Pet Dataset.
# Users should configure the fine_tune_checkpoint field in the train config as
# well as the label_map_path and input_path fields in the train_input_reader and
# eval_input_reader. Search for "/foo/pets" to find the fields that
# should be configured.

model {
  faster_rcnn {
    num_classes: 37
    image_resizer {
      keep_aspect_ratio_resizer {
        min_dimension: 600
        max_dimension: 1024
      }
    }
    feature_extractor {
      type: 'faster_rcnn_resnet101'
      first_stage_features_stride: 16
    }
    first_stage_anchor_generator {
      grid_anchor_generator {
        scales: [0.25, 0.5, 1.0, 2.0]
        aspect_ratios: [0.5, 1.0, 2.0]
        height_stride: 16
        width_stride: 16
      }
    }
    first_stage_box_predictor_conv_hyperparams {
      op: CONV
      regularizer {
        l2_regularizer {
          weight: 0.0
        }
      }
      initializer {
        truncated_normal_initializer {
          stddev: 0.01
        }
      }
    }
    first_stage_nms_score_threshold: 0.0
    first_stage_nms_iou_threshold: 0.7
    first_stage_max_proposals: 300
    first_stage_localization_loss_weight: 2.0
    first_stage_objectness_loss_weight: 1.0
    initial_crop_size: 14
    maxpool_kernel_size: 2
    maxpool_stride: 2
    second_stage_box_predictor {
      mask_rcnn_box_predictor {
        use_dropout: false
        dropout_keep_probability: 1.0
        fc_hyperparams {
          op: FC
          regularizer {
            l2_regularizer {
              weight: 0.0
            }
          }
          initializer {
            variance_scaling_initializer {
              factor: 1.0
              uniform: true
              mode: FAN_AVG
            }
          }
        }
      }
    }
    second_stage_post_processing {
      batch_non_max_suppression {
        score_threshold: 0.0
        iou_threshold: 0.6
        max_detections_per_class: 100
        max_total_detections: 300
      }
      score_converter: SOFTMAX
    }
    second_stage_localization_loss_weight: 2.0
    second_stage_classification_loss_weight: 1.0
  }
}

train_config: {
  batch_size: 1
  optimizer {
    momentum_optimizer: {
      learning_rate: {
        manual_step_learning_rate {
          initial_learning_rate: 0.0003
          schedule {
            step: 900000
            learning_rate: .00003
          }
          schedule {
            step: 1200000
            learning_rate: .000003
          }
        }
      }
      momentum_optimizer_value: 0.9
    }
    use_moving_average: false
  }
  gradient_clipping_by_norm: 10.0
  fine_tune_checkpoint: "/foo/pets/model.ckpt"
  from_detection_checkpoint: true
  load_all_detection_checkpoint_vars: true
  # Note: The below line limits the training process to 200K steps, which we
  # empirically found to be sufficient enough to train the pets dataset. This
  # effectively bypasses the learning rate schedule (the learning rate will
  # never decay). Remove the below line to train indefinitely.
  num_steps: 200000
  data_augmentation_options {
    random_horizontal_flip {
    }
  }
}

train_input_reader: {
  tf_record_input_reader {
    input_path: "/foo/pets/pet_faces_train.record-?????-of-00010"
  }
  label_map_path: "/foo/pets/pet_label_map.pbtxt"
}

eval_config: {
  metrics_set: "coco_detection_metrics"
  num_examples: 1101
}

eval_input_reader: {
  tf_record_input_reader {
    input_path: "/foo/pets/pet_faces_val.record-?????-of-00010"
  }
  label_map_path: "/foo/pets/pet_label_map.pbtxt"
  shuffle: false
  num_readers: 1
}
6. COCO APIのインストール
どうやらCOCO API(pycocotools)も使用するようです。
# /rootへ移動
cd

git clone https://github.com/cocodataset/cocoapi.git

cd cocoapi/PythonAPI

make

cp -r pycocotools /root/models/research/
7. libgl1-mesa-devのインストール
コンテナ環境だと9章のトレーニングを開始すると次のエラーが発生します。
なので、libgl1-mesa-devをインストールします。
apt install -y libgl1-mesa-dev
8. model_lib.pyのバグ修正(2018/8/7時点)
9章のトレーニングを開始すると次のエラーが発生します。
これを回避するには、models/research/object_detection/model_lib.pyの385行目のcategory_index.values()をlist(category_index.values())に変更します。
9. トレーニングと評価ジョブを開始する
cd /root/models/research/

PIPELINE_CONFIG_PATH=/foo/pets/faster_rcnn_resnet101_pets.config
MODEL_DIR=/foo/pets/
NUM_TRAIN_STEPS=50000
NUM_EVAL_STEPS=2000
time python object_detection/model_main.py \
    --pipeline_config_path=${PIPELINE_CONFIG_PATH} \
    --model_dir=${MODEL_DIR} \
    --num_train_steps=${NUM_TRAIN_STEPS} \
    --num_eval_steps=${NUM_EVAL_STEPS} \
    --alsologtostderr
実行時間
| GeForce GTX 1080 Ti 11GB | real 228m20.376s user 207m56.784s sys 56m43.472s |
5000ステップぐらいまではエラーなどで何度か中断しているので、上記は5000から50000ステップ迄の時間です。
[TensorBoard]
tensorboard --logdir /foo/pets --host 0.0.0.0
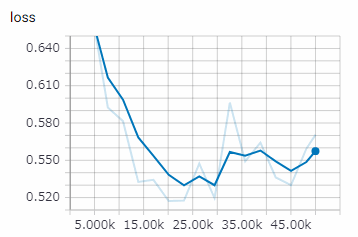
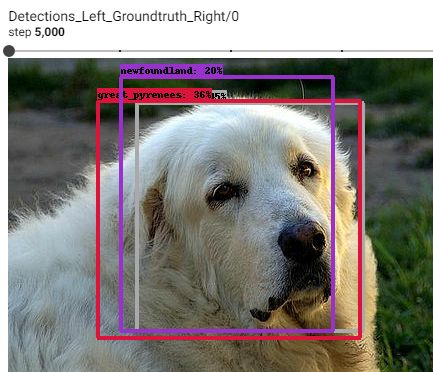
5,000ステップ
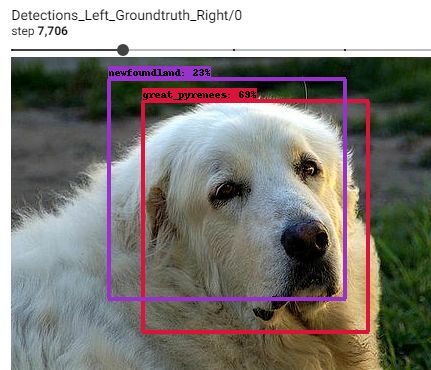
7,706ステップ
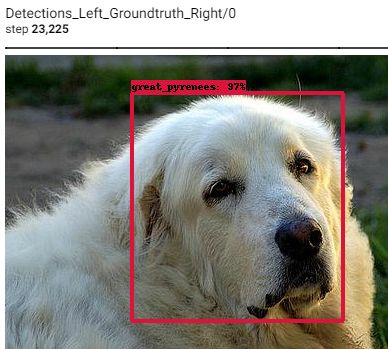
23,255ステップ
2万ステップぐらいで良いかも知れません。
10. Tensorflowグラフのエクスポート
モデルの訓練が終えたら、推論用にグラフをエキスポートします。
python object_detection/export_inference_graph.py \
    --input_type image_tensor \
    --pipeline_config_path /foo/pets/faster_rcnn_resnet101_pets.config \
    --trained_checkpoint_prefix /foo/pets/model.ckpt-50000 \
    --output_directory /foo/pets/exported_graphs
model.ckpt-50000の「50000」は各自が実際に実行したステップ数に変更してください。
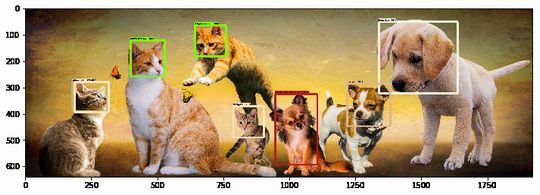
11. 推論(モデルの実行)
models/research/object_detection/object_detection_tutorial.ipynbをダウンロードして名称をpets.ipynbに変更します。次にmodels/research/object_detection/pets.ipynbに移動します。
Jupyter NoteBookで「pets.ipynb」を起動します。
[Model preparation]
次の変数を変更します。
PATH_TO_FROZEN_GRAPH = '/foo/pets/exported_graphs/frozen_inference_graph.pb'
PATH_TO_LABELS = '/foo/pets/pet_label_map.pbtxt'
NUM_CLASSES = 37
[Download Model]
ダウンロードする必要がないので、このセルは全てコメントにします。
[Detection]
テストする画像を変更する場合は、PATH_TO_TEST_IMAGES_DIR、TEST_IMAGE_PATHSを変更します。
推論するには「上から順番にRunする」 or 「メニューのKernel - Restart & Run All」を実行します。
12. pets.ipynbの簡易的な解説
// 推論を実行する
output_dict = run_inference_for_single_image()

  // Box (矩形範囲)
  output_dict['detection_boxes'],

  // Class(分類番号)
  output_dict['detection_classes'],

  // Score(スコア)
  output_dict['detection_scores'],
// 推論結果から画像の上にスコア、分類名を重ねる
vis_util.visualize_boxes_and_labels_on_image_array()

def visualize_boxes_and_labels_on_image_array(
  image,    // イメージ
  boxes,    // Box
  classes,  // Class
  scores,   // Score
  category_index,            // カテゴリ辞書
  instance_masks=None,
  instance_boundaries=None,
  keypoints=None,
  use_normalized_coordinates=False,
  max_boxes_to_draw=20,// 視覚化するボックスの最大数
  min_score_thresh=.5, // 視覚化されるボックスの最小スコア閾値
  agnostic_mode=False, // クラスに依存しないモードで評価する
  line_thickness=4,    // ボックスの線幅
  groundtruth_box_visualization_color='black',
  skip_scores=False,
  skip_labels=False):
min_score_threshはデフォルトでは「.5」(50%)になっているので、これを下げれば表示されるBoxが増加します。
visualize_boxes_and_labels_on_image_arrayの引数の詳細はvisualization_utils.pyをご覧ください。
13. 最後に
ここまで出来れば、後は「オリジナルのデータセット」を用意すれば顔認識、自動車認識、寿司認識やら任意の物体を検出可能です。
次回はオリジナルのデータセットで物体検出を行います。
参考URL
Running Locally (公式)
関連記事
| 前の記事: | 画像内の物体を検出するObject Detection APIの使用方法 [TensorFlow] |
| 次の記事: | 画像内の「カップラーメン」を検出する [Object Detection API] |

プチモンテ ※この記事を書いた人
 | |
| 💻 ITスキル・経験 サーバー構築からWebアプリケーション開発。IoTをはじめとする電子工作、ロボット、人工知能やスマホ/OSアプリまで分野問わず経験。 画像処理/音声処理/アニメーション、3Dゲーム、会計ソフト、PDF作成/編集、逆アセンブラ、EXE/DLLファイルの書き換えなどのアプリを公開。詳しくは自己紹介へ |
| 🎵 音楽制作 BGMは楽器(音源)さえあれば、何でも制作可能。歌モノは主にロック、バラード、ポップスを制作。歌詞は抒情詩、抒情的な楽曲が多い。楽曲制作は🔰2023年12月中旬 ~ | |
オリジナルゲームをつくってみました✨
Peasant Samurai ~ 百姓ノ持チタル国 (2026/8/3 公開予定)https://store.steampowered.com/app/4880700/Peasant_Samurai/
「民」が主役の幻想戦国RTS/街づくりゲーム