画像内の「カップラーメン」を検出する [Object Detection API]
今回は「カップラーメン」のオリジナルデータセットを使用して、TensorFlowのObject Detection APIで画像内のカップラーメンを検出します。
この記事及びプロジェクトは「一般物体検出アルゴリズム」のSSD(Single shot multibox detector)を使用した研究を目的としています。
※データセットを含むソースコードはGitHubで公開しています。
加筆(2021年3月30日)
この記事は2018年08月08日に「Ubuntu16.04 + TensolFlow1.9.0」で作成されました。2021年3月30日に「Windows10 + TensolFlow1.15.5」でも動作するように記事を加筆しました。
Googleが公開していた「object_detection_tutorial.ipynb」のPythonコードが公開されなくなりましたので、それもこのページの下部にある13章のWindows版でご紹介します。
Windowsの方は今回、加筆した13章のWindows版からご覧ください。
※なお、加筆時点での動作確認はWindows版のみです。
※Ubuntuの方もWindows版を確認すると解決できる場合があります。
ここで使用している「tensorflow/models」は
https://github.com/tensorflow/models
ではなく
https://github.com/tensorflow/models/tree/archive/
のアーカイブに移動されました。
前提条件
| 画像内の「犬猫の品種」を検出するトレーニングをローカルで行う |
の続きとなります。事前準備がありますので先にご覧ください。
1. 共有フォルダに専用フォルダを作成する
ホストOSとコンテナの「共有フォルダ」は次のようになっています。
/home/ユーザー名/tensor
[コンテナ側]
/foo
今回は/fooに「cup」フォルダを作成して使用します。
※コンテナ上の/fooは、実質的に/home/ユーザー名/tensorと同じです。
2. ラベリング
ラベリングでは各画像の「何処に何があるか」を指定する必要があります。
今回はLabelImgというツールを使用して手動でラベル付けを行います。
[ファイル構成]
| images/ | 画像を収納する |
| annotations/ | xmlファイルを収納する |
| annotations/trainval.txt | 拡張子を除くファイル名の一覧を記述する |
xmlファイルはLabelImgで作成します。trainval.txtは適当なコマンドやプログラムでリストして下さい。(trainval.txtの例)
[LabelImgの使い方]
LabelImgを起動して「Open Dir」でimagesフォルダを選択します。1枚毎に「Create RectBox」アイコンを選択して範囲を選択します。その後に、ラベルを入力して「save」でXMLファイルを出力します。
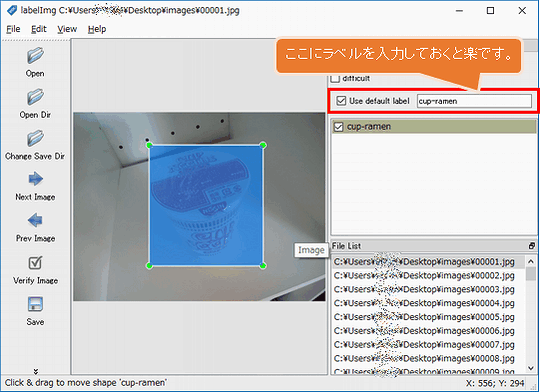
※XMLのフォーマットはデフォルトの「PscalVOC」のままにして下さい。(左メニューのアイコンがPscalVOCならばOK)
全てのラベリング作業が完了したら、全てのXMLファイルの<path></path>のパスをLinuxならgrep、Windowsなら秀丸のGREP置換などで絶対パス(フルパス)に変更します。
これらのファイルを
/foo/cup/annotations
に移動します。
3. create_tf_record.pyを作成する
object_detection/dataset_toolsにあるTFRecordファイルを作成するコードでも良いのですが、少し複雑だったのでJwataさんのcreate_tf_record.py(MITライセンス)をテンプレートとします。
94/95行目の
train_output_path = os.path.join(FLAGS.output_dir, 'sushi_train.record')
val_output_path = os.path.join(FLAGS.output_dir, 'sushi_val.record')
を
train_output_path = os.path.join(FLAGS.output_dir, 'cup_train.record')
val_output_path = os.path.join(FLAGS.output_dir, 'cup_val.record')
に変更します。
※ファイルは/foo/cup/create_tf_record.pyに移動します。
4. cup_label_map.pbtxtを作成する
今回はカップラーメンのみの認識なので、1つだけです。
[cup_label_map.pbtxt]
item {
  id: 1
  name: 'cup-ramen'
}
※ファイルは/foo/cup/cup_label_map.pbtxtに移動します。
5. ライブラリパスを通しておく
cd /root/models/research/

export PYTHONPATH=$PYTHONPATH:`pwd`:`pwd`/slim
6. TFRecordファイルを作成する
cd /foo/cup

python create_tf_record.py \
    --annotations_dir=`pwd`/annotations \
    --images_dir=`pwd`/images \
    --output_dir=`pwd` \
    --label_map_path=cup_label_map.pbtxt
/foo/cupにcup_train.record及びcup_val.recordが作成されます。
7. 事前学習モデルをダウンロードする
検出モデル動物園で任意の学習済みモデルをダウンロードするのですが、今回は軽量で高速な「ssd_mobilenet_v1_coco」を使用します。
cd /foo/cup

wget http://download.tensorflow.org/models/object_detection/ssd_mobilenet_v1_coco_2018_01_28.tar.gz
次にUbuntu側のユーザーで「/foo/cup/ssd_mobilenet_v1_coco_2018_01_28.tar.gz」を右クリックして「ここで展開する」を選択します。
そして、その「ssd_mobilenet_v1_coco_2018_01_28」フォルダをssdというフォルダ名に変更します。
ここで/foo/cupのファイル構成は次のようになります。
[フォルダ]
annotations
images
ssd

[圧縮ファイル]
ssd_mobilenet_v1_coco_2018_01_28.tar.gz

[TFRecord]
cup_train.record
cup_val.record

[その他]
create_tf_record.py
cup_label_map.pbtxt
8. Configファイルの設定
ココ からダウンロードして、次のように変更します。
[ssd_mobilenet_v1_coco.config]
# SSD with Mobilenet v1 configuration for MSCOCO Dataset.
# Users should configure the fine_tune_checkpoint field in the train config as
# well as the label_map_path and input_path fields in the train_input_reader and
# eval_input_reader. Search for "PATH_TO_BE_CONFIGURED" to find the fields that
# should be configured.

model {
  ssd {
    num_classes: 90
    box_coder {
      faster_rcnn_box_coder {
        y_scale: 10.0
        x_scale: 10.0
        height_scale: 5.0
        width_scale: 5.0
      }
    }
    matcher {
      argmax_matcher {
        matched_threshold: 0.5
        unmatched_threshold: 0.5
        ignore_thresholds: false
        negatives_lower_than_unmatched: true
        force_match_for_each_row: true
      }
    }
    similarity_calculator {
      iou_similarity {
      }
    }
    anchor_generator {
      ssd_anchor_generator {
        num_layers: 6
        min_scale: 0.2
        max_scale: 0.95
        aspect_ratios: 1.0
        aspect_ratios: 2.0
        aspect_ratios: 0.5
        aspect_ratios: 3.0
        aspect_ratios: 0.3333
      }
    }
    image_resizer {
      fixed_shape_resizer {
        height: 300
        width: 300
      }
    }
    box_predictor {
      convolutional_box_predictor {
        min_depth: 0
        max_depth: 0
        num_layers_before_predictor: 0
        use_dropout: false
        dropout_keep_probability: 0.8
        kernel_size: 1
        box_code_size: 4
        apply_sigmoid_to_scores: false
        conv_hyperparams {
          activation: RELU_6,
          regularizer {
            l2_regularizer {
              weight: 0.00004
            }
          }
          initializer {
            truncated_normal_initializer {
              stddev: 0.03
              mean: 0.0
            }
          }
          batch_norm {
            train: true,
            scale: true,
            center: true,
            decay: 0.9997,
            epsilon: 0.001,
          }
        }
      }
    }
    feature_extractor {
      type: 'ssd_mobilenet_v1'
      min_depth: 16
      depth_multiplier: 1.0
      conv_hyperparams {
        activation: RELU_6,
        regularizer {
          l2_regularizer {
            weight: 0.00004
          }
        }
        initializer {
          truncated_normal_initializer {
            stddev: 0.03
            mean: 0.0
          }
        }
        batch_norm {
          train: true,
          scale: true,
          center: true,
          decay: 0.9997,
          epsilon: 0.001,
        }
      }
    }
    loss {
      classification_loss {
        weighted_sigmoid {
        }
      }
      localization_loss {
        weighted_smooth_l1 {
        }
      }
      hard_example_miner {
        num_hard_examples: 3000
        iou_threshold: 0.99
        loss_type: CLASSIFICATION
        max_negatives_per_positive: 3
        min_negatives_per_image: 0
      }
      classification_weight: 1.0
      localization_weight: 1.0
    }
    normalize_loss_by_num_matches: true
    post_processing {
      batch_non_max_suppression {
        score_threshold: 1e-8
        iou_threshold: 0.6
        max_detections_per_class: 100
        max_total_detections: 100
      }
      score_converter: SIGMOID
    }
  }
}

train_config: {
  batch_size: 24
  optimizer {
    rms_prop_optimizer: {
      learning_rate: {
        exponential_decay_learning_rate {
          initial_learning_rate: 0.004
          decay_steps: 800720
          decay_factor: 0.95
        }
      }
      momentum_optimizer_value: 0.9
      decay: 0.9
      epsilon: 1.0
    }
  }
  fine_tune_checkpoint: "/foo/cup/ssd/model.ckpt"
  from_detection_checkpoint: true
  # Note: The below line limits the training process to 200K steps, which we
  # empirically found to be sufficient enough to train the pets dataset. This
  # effectively bypasses the learning rate schedule (the learning rate will
  # never decay). Remove the below line to train indefinitely.
  num_steps: 200000
  data_augmentation_options {
    random_horizontal_flip {
    }
  }
  data_augmentation_options {
    ssd_random_crop {
    }
  }
}

train_input_reader: {
  tf_record_input_reader {
    input_path: "/foo/cup/cup_train.record"
  }
  label_map_path: "/foo/cup/cup_label_map.pbtxt"
}

eval_config: {
  num_examples: 8000
  # Note: The below line limits the evaluation process to 10 evaluations.
  # Remove the below line to evaluate indefinitely.
  max_evals: 10
}

eval_input_reader: {
  tf_record_input_reader {
    input_path: "/foo/cup/cup_val.record"
  }
  label_map_path: "/foo/cup/cup_label_map.pbtxt"
  shuffle: false
  num_readers: 1
}
※ファイルは/foo/cup/ssd_mobilenet_v1_coco.configに移動します。
また、fine_tune_checkpointをコメントにすると学習済みのモデルを使用しないで0から学習できるようです。
9. トレーニングと評価ジョブを開始する
cd /root/models/research/

PIPELINE_CONFIG_PATH=/foo/cup/ssd_mobilenet_v1_coco.config
MODEL_DIR=/foo/cup/
NUM_TRAIN_STEPS=30000
NUM_EVAL_STEPS=2000
time python object_detection/model_main.py \
    --pipeline_config_path=${PIPELINE_CONFIG_PATH} \
    --model_dir=${MODEL_DIR} \
    --num_train_steps=${NUM_TRAIN_STEPS} \
    --num_eval_steps=${NUM_EVAL_STEPS} \
    --alsologtostderr
[実行時間]
| GeForce GTX 1080 Ti 11GB | real 195m13.459s |
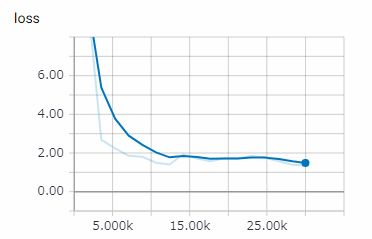
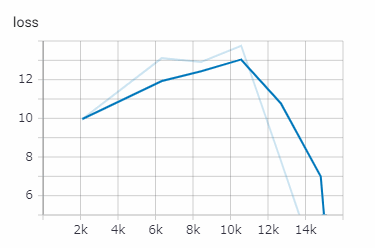
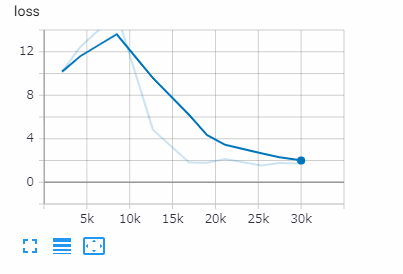
[TensorBoard]
tensorboard --logdir /foo/cup--host 0.0.0.0
これは練習用なので1万ステップでも良いです。
10. Tensorflowグラフのエクスポート
モデルの訓練が終えたら、推論用にグラフをエキスポートします。
python object_detection/export_inference_graph.py \
    --input_type image_tensor \
    --pipeline_config_path /foo/cup/ssd_mobilenet_v1_coco.config \
    --trained_checkpoint_prefix /foo/cup/model.ckpt-30000 \
    --output_directory /foo/cup/exported_graphs
model.ckpt-30000の「30000」は各自が実際に実行したステップ数に変更してください。
11. テストイメージの移動
/foo/cupにテスト用画像のtestフォルダを移動します。
12. 推論(モデルの実行)
models/research/object_detection/object_detection_tutorial.ipynbをダウンロードして名称をcup.ipynbに変更します。次にmodels/research/object_detection/cup.ipynbに移動します。
Jupyter NoteBookで「cup.ipynb」を起動します。
[Model preparation]
次の変数を変更します。
PATH_TO_FROZEN_GRAPH = '/foo/cup/exported_graphs/frozen_inference_graph.pb'
PATH_TO_LABELS = '/foo/cup/cup_label_map.pbtxt'
NUM_CLASSES = 1
[Download Model]
ダウンロードする必要がないので、このセルは全てコメントにします。
[Detection]
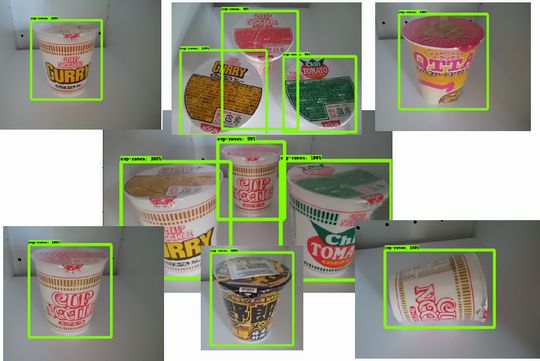
12枚のテスト用画像の設定です。
PATH_TO_TEST_IMAGES_DIR = '/foo/cup/test'
TEST_IMAGE_PATHS = [ os.path.join(PATH_TO_TEST_IMAGES_DIR, '{}.jpg'.format(i)) for i in range(1, 13) ]
推論するには「上から順番にRunする」 or 「メニューのKernel - Restart & Run All」を実行します。
最後に
今回は色々な角度の「カップヌードルの写真」を54枚使用して「カップラーメン」として機械学習を行いました。
これを応用、発展させれば業務上でも使用できる「物体検出器」を作ることが可能だと思います。
13. Windows版
13-1. 精度について
TensolFlow1.9.0の時は1つの画像内の複数のカップラーメンを発見してくれたのですが、TensolFlow1.15.5になると複数の発見率は下がっています。
これはあくまでも「練習」なのでトレーニング画像が極端に少ないです。その影響でカップラーメン以外もカップラーメンと誤認識します。本格的にやる場合はトレーニング画像を大幅に増やして、矩形の数なども増やしてください。
13-2. 必要なファイル群
| Cup_Ramen_detector | ダウンロード |
| tensorflow/models (アーカイブ版/旧版) | ダウンロード |
| TensorFlow 1 Detection Model Zoo ※必要なのはssd_mobilenet_v1_coco | ダウンロード ※右クリでダウンロード |
これらのファイルはいずれ削除されるかも知れませんので、ローカルのパソコンに保存しておくと良いです。
13-3. ファイルのパス
Ubuntu用の解説に出てくる
/foo/cup
は
C:\Users\ユーザー名\Desktop\foo\cup
とします。
[Cup_Ramen_detector-master.zip]
展開して次のように配置する。
C:\Users\ユーザー名\Desktop\foo\cup\annotations
C:\Users\ユーザー名\Desktop\foo\cup\images
C:\Users\ユーザー名\Desktop\foo\cup\test
C:\Users\ユーザー名\Desktop\foo\cup\create_tf_record.py
C:\Users\ユーザー名\Desktop\foo\cup\cup_label_map.pbtxt
C:\Users\ユーザー名\Desktop\foo\cup\ssd_mobilenet_v1_coco.config
[models-archive.zip]
展開して次のように配置する。
C:\Users\ユーザー名\Desktop\models-archive

// 注意、以下ではないです。
C:\Users\ユーザー名\Desktop\models-archive\models-archive
[ssd_mobilenet_v1_coco_2018_01_28.tar.gz]
展開して次のように配置する。
C:\Users\ユーザー名\Desktop\foo\cup\ssd\saved_model
C:\Users\ユーザー名\Desktop\foo\cup\ssd\checkpoint
C:\Users\ユーザー名\Desktop\foo\cup\ssd\frozen_inference_graph.pb
C:\Users\ユーザー名\Desktop\foo\cup\ssd\model.ckpt.data-00000-of-00001
C:\Users\ユーザー名\Desktop\foo\cup\ssd\model.ckpt.index
C:\Users\ユーザー名\Desktop\foo\cup\ssd\model.ckpt.meta
C:\Users\ユーザー名\Desktop\foo\cup\ssd\pipeline.config
13-4. C:\Users\ユーザー名\Desktop\foo\cup\annotations
全てのXMLファイル(54ファイル)を次のように変更する
[変更前]
<path>/foo/cup/images/00001.jpg</path>
[変更後]
<path>C:/Users/ユーザー名/Desktop/foo/cup/images/00001.jpg</path>
「¥」ではなく「/」です。注意して下さい。
13-5. ssd_mobilenet_v1_coco.config
次のように変更してください。
num_classesを1にする

fine_tune_checkpoint: "C:/Users/ユーザー名/Desktop/foo/cup/ssd/model.ckpt"

train_input_readerの2つを変更
  input_path: "C:/Users/ユーザー名/Desktop/foo/cup/cup_train.record"
  label_map_path: "C:/Users/ユーザー名/Desktop/foo/cup/cup_label_map.pbtxt"

eval_input_readerの2つを変更
  input_path: "C:/Users/ユーザー名/Desktop/foo/cup/cup_val.record"
  label_map_path: "C:/Users/ユーザー名/Desktop/foo/cup/cup_label_map.pbtxt"
13-6. create_tf_record.py
ファイルの最上部に次のコードを追記します。
import sys
sys.path.append('C:/Users/ユーザー名/Desktop/models-archive/research')
13-7. 各パッケージのインストール
コマンドプロンプトを管理者権限で実行してから次のコマンドを実行。
pip install tf_slim
pip install scipy

# COCO APIのインストール
pip install pycocotools-windows
COCO APIの本家はこちらです。Linuxでコンパイルする際はこちら(cpのコピー先は「/root/models/research/」ではなく「C:¥Users¥ユーザー名¥Desktop¥models-archive¥research」)
13-8. cup_train.record/cup_val.recordの作成
次のコマンドを実行する。
cd C:\Users\ユーザー名\Desktop\foo\cup

python create_tf_record.py ^
  --annotations_dir=./annotations  ^
  --images_dir=./images  ^
  --output_dir=.  ^
  --label_map_path=cup_label_map.pbtxt
13-9. protobuf-compilerのインストールとコンパイル
申し訳ないのですが、ここはUbuntu18.04でやりました。WSL2(Windows Subsystem for Linux)のUbuntu18.04です。WSL2のUbuntu18.04をインストールするをご参照ください。
sudo apt install protobuf-compiler
cd /mnt/c/Users/ユーザー名/Desktop/models-archive/research
protoc object_detection/protos/*.proto --python_out=.
実行後に「models-archive¥research¥object_detection¥protos」に「string_int_label_map_pb2.py」など約30ファイルぐらいのPythonファイルが作成されます。
※「/mnt/c/」は「C:¥」の事です。
13-10. model_main.py
次のファイルの上部にコードを追記します。
[c:\Users\ユーザー名\Desktop\models-archive\research\object_detection\model_main.py]
import sys
sys.path.append('C:/Users/ユーザー名/Desktop/models-archive/research')
sys.path.append('C:/Users/ユーザー名/Desktop/models-archive/research/slim')
13-11. トレーニングと評価ジョブを開始する
cd c:\Users\ユーザー名\Desktop\models-archive\research

python object_detection/model_main.py ^
  --pipeline_config_path=C:\Users\ユーザー名\Desktop\foo\cup\ssd_mobilenet_v1_coco.config ^
  --model_dir=C:\Users\ユーザー名\Desktop\foo\cup\ ^
  --num_train_steps=30000 ^
  --num_eval_steps=2000 ^
  --alsologtostderr
num_train_stepsは訓練ステップ数です。最大200K。訓練するほど良いですが過学習(精度が悪くなる)になる場合もあります。
[15000ステップ 1時間12分]
[30000ステップ 2時間23分]
[60000ステップ 5時間00分]
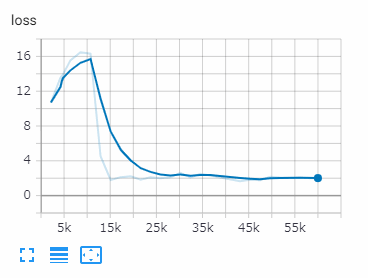
この時間は「GeForce GTX 1080 Ti 11GB」での結果です。
このトレーニングは途中結果をチェックポイントに保存しているので、後からそのポイントからトレーニングの再開が可能です。
13-12. TensorBoard
TensorBoardでトレーニング状態を確認できます。トレーニング中とは別に新しくコマンドプロンプトを開いて次のコマンドを実行します。
tensorboard --logdir C:\Users\ユーザー名\Desktop\foo\cup --host 0.0.0.0
http://localhost:6006/ にアクセスすれば確認可能です。
13-13. export_inference_graph.py
次のファイルの上部にコードを追記します。
[c:\Users\ユーザー名\Desktop\models-archive\research\object_detection\export_inference_graph.py]
import sys
sys.path.append('C:/Users/ユーザー名/Desktop/models-archive/research')
sys.path.append('C:/Users/ユーザー名/Desktop/models-archive/research/slim')
13-14. Tensorflowグラフのエクスポート
次のコマンドでPBファイル(Protocol Buffers形式)を作成します。
cd c:\Users\ユーザー名\Desktop\models-archive\research

python object_detection/export_inference_graph.py ^
  --input_type image_tensor ^
  --pipeline_config_path C:\Users\ユーザー名\Desktop\foo\cup\ssd_mobilenet_v1_coco.config ^
  --trained_checkpoint_prefix C:\Users\ユーザー名\Desktop\foo\cup\model.ckpt-30000 ^
  --output_directory C:\Users\ユーザー名\Desktop\foo\cup\exported_graphs
model.ckpt-30000の30000の部分は任意のチェックポイントです。
exported_graphsにfrozen_inference_graph.pbなどが生成されます。
13-15. object_detection_tutorial.ipynb
13-14のfrozen_inference_graph.pbを使用して画像からカップラーメンを検出するAIモデルを実行(推論)します。「Jupyter Notebook」に貼り付けて実行します。
※frozen_inference_graph.pbやJPGファイルのパスに注意。
%%time
import tensorflow as tf
import numpy as np
from PIL import Image

detection_graph = tf.Graph()
with detection_graph.as_default():
    od_graph_def = tf.GraphDef()
    with tf.gfile.GFile('frozen_inference_graph.pb', 'rb') as fid:
        serialized_graph = fid.read()
        od_graph_def.ParseFromString(serialized_graph)
        tf.import_graph_def(od_graph_def, name='')

def load_image_into_numpy_array(image):
  (im_width, im_height) = image.size
  return np.array(image.getdata()).reshape(
      (im_height, im_width, 3)).astype(np.uint8)

def run_inference_for_single_image(image, graph):
    with graph.as_default():
        with tf.Session() as sess:
            # Get handles to input and output tensors
            ops = tf.get_default_graph().get_operations()
            all_tensor_names = {output.name for op in ops for output in op.outputs}

            tensor_dict = {}
            for key in [
                    'num_detections', 'detection_boxes', 'detection_scores',
                    'detection_classes', 'detection_masks'
            ]:
                tensor_name = key + ':0'
                if tensor_name in all_tensor_names:
                    tensor_dict[key] = tf.get_default_graph().get_tensor_by_name(
                            tensor_name)
            if 'detection_masks' in tensor_dict:
                # The following processing is only for single image
                detection_boxes = tf.squeeze(tensor_dict['detection_boxes'], [0])
                detection_masks = tf.squeeze(tensor_dict['detection_masks'], [0])
                # Reframe is required to translate mask from box coordinates to image coordinates and fit the image size.
                real_num_detection = tf.cast(tensor_dict['num_detections'][0], tf.int32)
                detection_boxes = tf.slice(detection_boxes, [0, 0], [real_num_detection, -1])
                detection_masks = tf.slice(detection_masks, [0, 0, 0], [real_num_detection, -1, -1])
                detection_masks_reframed = utils_ops.reframe_box_masks_to_image_masks(
                        detection_masks, detection_boxes, image.shape[0], image.shape[1])
                detection_masks_reframed = tf.cast(
                        tf.greater(detection_masks_reframed, 0.5), tf.uint8)
                # Follow the convention by adding back the batch dimension
                tensor_dict['detection_masks'] = tf.expand_dims(
                        detection_masks_reframed, 0)

            image_tensor = tf.get_default_graph().get_tensor_by_name('image_tensor:0')

            # Run inference
            output_dict = sess.run(tensor_dict,
                                   feed_dict={image_tensor: np.expand_dims(image, 0)})

            # all outputs are float32 numpy arrays, so convert types as appropriate
            output_dict['num_detections'] = int(output_dict['num_detections'][0])
            output_dict['detection_classes'] = output_dict[
                    'detection_classes'][0].astype(np.uint8)
            output_dict['detection_boxes'] = output_dict['detection_boxes'][0]
            output_dict['detection_scores'] = output_dict['detection_scores'][0]
            if 'detection_masks' in output_dict:
                output_dict['detection_masks'] = output_dict['detection_masks'][0]
    return output_dict

image = Image.open('cup\testにあるカップラーメンの画像.jpg')

# the array based representation of the image will be used later in order to prepare the
# result image with boxes and labels on it.
image_np = load_image_into_numpy_array(image)
# Expand dimensions since the model expects images to have shape: [1, None, None, 3]
image_np_expanded = np.expand_dims(image_np, axis=0)
# Actual detection.
output_dict = run_inference_for_single_image(image_np, detection_graph)

import sys
sys.path.append('C:/Users/ユーザー名/Desktop/models-archive/research/')
sys.path.append('C:/Users/ユーザー名/Desktop/models-archive/research/object_detection')
from utils import visualization_utils as vis_util
from utils import label_map_util
from matplotlib import pyplot as plt

NUM_CLASSES = 1
PATH_TO_LABELS = 'C:/Users/ユーザー名/Desktop/foo/cup/cup_label_map.pbtxt'

label_map = label_map_util.load_labelmap(PATH_TO_LABELS)
categories = label_map_util.convert_label_map_to_categories(label_map, max_num_classes=NUM_CLASSES, use_display_name=True)
category_index = label_map_util.create_category_index(categories)
IMAGE_SIZE = (12, 8)

# Visualization of the results of a detection.
%matplotlib inline
vis_util.visualize_boxes_and_labels_on_image_array(
      image_np,
      output_dict['detection_boxes'],
      output_dict['detection_classes'],
      output_dict['detection_scores'],
      # カテゴリ辞書
      category_index,
      # 最小スコア閾値(デフォルトは50%だが5%に下げる)
      # ※この値を下げれば表示されるBoxが増加します。
      min_score_thresh= 0.05,
      instance_masks=output_dict.get('detection_masks'),
      # 正規化された座標を使用する
      use_normalized_coordinates=True,
      # 線の太さ
      line_thickness=4)
plt.figure(figsize=IMAGE_SIZE)
plt.imshow(image_np)
print('完了しました。')
このコードの元の著作権はGoogleです。私が適当に改変しています。
以上となります。お疲れさまでした。
おもちゃのAI研究室
https://www.petitmonte.com/ai/
関連記事
| 前の記事: | 画像内の「犬猫の品種」を検出するトレーニングをローカルで行う [Object Detection API] |
| 次の記事: | 複数のTFRecord形式のファイルを生成する [create_pet_tf_record.pyの改造] |

プチモンテ ※この記事を書いた人
 | |
| 💻 ITスキル・経験 サーバー構築からWebアプリケーション開発。IoTをはじめとする電子工作、ロボット、人工知能やスマホ/OSアプリまで分野問わず経験。 画像処理/音声処理/アニメーション、3Dゲーム、会計ソフト、PDF作成/編集、逆アセンブラ、EXE/DLLファイルの書き換えなどのアプリを公開。詳しくは自己紹介へ |
| 🎵 音楽制作 BGMは楽器(音源)さえあれば、何でも制作可能。歌モノは主にロック、バラード、ポップスを制作。歌詞は抒情詩、抒情的な楽曲が多い。楽曲制作は🔰2023年12月中旬 ~ | |
オリジナルゲームをつくってみました✨
Peasant Samurai ~ 百姓ノ持チタル国 (2026/8/3 公開予定)https://store.steampowered.com/app/4880700/Peasant_Samurai/
「民」が主役の幻想戦国RTS/街づくりゲーム