レンタルサーバー(Apache)でLaravelを動かす [バリュードメイン(コアサーバー)]
バリュードメインのコアサーバー(レンタルサーバー)でLaravelを本番稼働させます。バリュードメイン系列ならば、XREA、バリューサーバーでも設定方法は恐らく同じだと思います。
やること
プロジェクト(test)を次のように設置します。
https://www.example.com/test/
ルーティングは
// 一覧表示
https://www.example.com/test/
// 登録画面
https://www.example.com/test/add
の2画面です。
1. プロジェクトの生成
今回はLTSのLaravel6系で生成します。
composer create-project --prefer-dist laravel/laravel test "6.*"
2. 各ファイル
app\Http\Controllers\HelloController.php
<?php

namespace App\Http\Controllers;

use Illuminate\Http\Request;
use Illuminate\Http\Response;
use Illuminate\Support\Facades\DB;

class HelloController extends Controller
{
    public function index(Request $request)
    {
        $items = DB::table('people')->get();
        return view('hello.index', ['items' => $items]);
    }

    public function add(Request $request)
    {
        return view('hello.add');
    }

    public function create(Request $request)
    {
        $param = [
            'name' => $request->name,
            'mail' => $request->mail,
            'age' => $request->age,
        ];
        DB::table('people')->insert($param);
        return redirect('/');
    }
}
resources\views\hello\index.blade.php
{{ config('app.name') }}

<table>
@foreach ($items as $item)
  <tr>
    <td>{{$item->name}}</td>
    <td>{{$item->mail}}</td>
    <td>{{$item->age}}</td>
  </tr>
@endforeach
</table>
resources\views\hello\add.blade.php
<form action="{{ url('/add') }}" method="post">
  <table>
    @csrf
    <tr><th>name: </th><td><input type="text" name="name"></td></tr>
    <tr><th>mail: </th><td><input type="text" name="mail"></td></tr>
    <tr><th>age: </th><td><input type="text" name="age"></td></tr>
    <tr><th></th><td><input type="submit" value="登録する"></td></tr>
  </table>
</form>
routes\web.php
<?php

Route::get('/', 'HelloController@index');
Route::get('/add', 'HelloController@add');
Route::post('/add', 'HelloController@create');
database\migrations\
2020_10_10_054559_create_people_table.php
<?php

use Illuminate\Database\Migrations\Migration;
use Illuminate\Database\Schema\Blueprint;
use Illuminate\Support\Facades\Schema;

class CreatePeopleTable extends Migration
{
    public function up()
    {

       Schema::create('people', function (Blueprint $table) {
           $table->bigIncrements('id');
           $table->string('name');
           $table->string('mail');
           $table->integer('age');
           $table->timestamps();
       });
    }

    public function down()
    {
        Schema::dropIfExists('people');
    }
}
.env (データベース設定)
DB_DATABASE=サーバーのDB設定
DB_USERNAME=サーバーのDB設定
DB_PASSWORD=サーバーのDB設定
3. ファイルのアップロード
サーバーに全てのファイルを丸ごとアップロードします。
※転送に失敗するゴミファイルは無視でOK!
4. Composer/PHPの確認
サーバー側で次のコマンドを実行する。
which composer
php -v
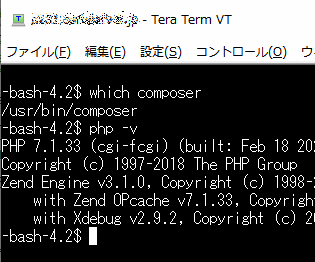
※composer -v は失敗します。
5. マイグレーション
サーバー側で次のコマンドを実行する。
php artisan migrate
次のようなエラーが発生する
-bash-4.2$ php artisan migrate
PHP Fatal error:  Declaration of Symfony\Component\Translation\TranslatorInterface::setLocale($locale) must be compatible with Symfony\Contracts\Translation\LocaleAwareInterface::setLocale(string $locale) in ???/test/vendor/symfony/translation/TranslatorInterface.php on line 24
PHP Stack trace:
PHP   1. {main}() ???/test/artisan:0
PHP   2. App\Console\Kernel->handle() ???/test/artisan:36
ローカル側でcomposer.jsonに次の行を追記します。
[composer.json]
"require": {
     ...
     "symfony/translation": "4.3.8"
}
次にコマンドをローカルで実行する。
composer update
レンタルサーバーではcomposer updateは使用できない。
あとは全てのファイルを丸ごとサーバーに転送すればOK!
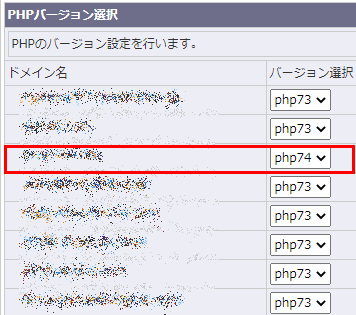
その後に、手動でバリュードメインの管理画面でPHP設定をPHP7.4にする。
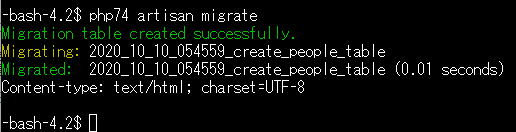
5分後ぐらいにサーバー側で次のコマンドを実行する。
php74 artisan migrate
次のように表示されればOK!
※最初からphp74 artisan migrateが動作すれば、composer.jsonの編集と「composer update」は不要かも知れません。
6. .htaccessの設定
www.example.com/test/public を www.example.com/test/ にする方法です。(LaravelをApacheで稼働させる場合はデフォルトはpublicとなる)
xxx.confなどはレンタルサーバーでは編集できないと思われるのでプロジェクトフォルダに.htaccessを設置します。
[.htaccess]
<IfModule mod_rewrite.c>
    <IfModule mod_negotiation.c>
        Options -MultiViews
    </IfModule>

    RewriteEngine On

    RewriteCond %{REQUEST_FILENAME} -d [OR]
    RewriteCond %{REQUEST_FILENAME} -f
    RewriteRule ^ ^$1 [N]

    RewriteCond %{REQUEST_URI} (\.\w+$) [NC]
    RewriteRule ^(.*)$ public/$1

    RewriteCond %{REQUEST_FILENAME} !-d
    RewriteCond %{REQUEST_FILENAME} !-f
    RewriteRule ^ server.php

</IfModule>
作成者:https://gist.github.com/liaotzukai/8e61a3f6dd82c267e05270b505eb6d5a
7. 本番環境のURLへアクセスする
https://www.example.com/test/ (一覧)
https://www.example.com/test/add (登録)
本稼働させる場合は.envファイルの(APP_ENV=production, APP_DEBUG=false)などを各自で調整して下さい
関連記事
| 前の記事: | Laravelをインストールする [WSL/Ubuntu環境] |
| 次の記事: | SQLSTATE[42000]: Syntax error or access violation: 1055 [Laravelのエラー] |

プチモンテ ※この記事を書いた人
 | |
| 💻 ITスキル・経験 サーバー構築からWebアプリケーション開発。IoTをはじめとする電子工作、ロボット、人工知能やスマホ/OSアプリまで分野問わず経験。 画像処理/音声処理/アニメーション、3Dゲーム、会計ソフト、PDF作成/編集、逆アセンブラ、EXE/DLLファイルの書き換えなどのアプリを公開。詳しくは自己紹介へ |
| 🎵 音楽制作 BGMは楽器(音源)さえあれば、何でも制作可能。歌モノは主にロック、バラード、ポップスを制作。歌詞は抒情詩、抒情的な楽曲が多い。楽曲制作は🔰2023年12月中旬 ~ | |