各種コントロールの画面設計(ConstraintLayout)とイベント [Android Studio]
目次
1. 作るもの
2. 各コントロールを配置する
3. レイアウトのエラーと警告
3-1. マージン(margin)を設定する
3-2. 文字列をリソースで定義して使用する
4. コントロールのグループ化(チェーン)
5. 画像の追加
6. ラムダ式に対応させる
7. コーディング
8. 画面をスクロールさせる
事前準備
メニューの[ファイル][新規]の「新規プロジェクト」でプロジェクトを作成します。その時にアクティビティは「空のアクティビティ」を選択します。
1. 作るもの
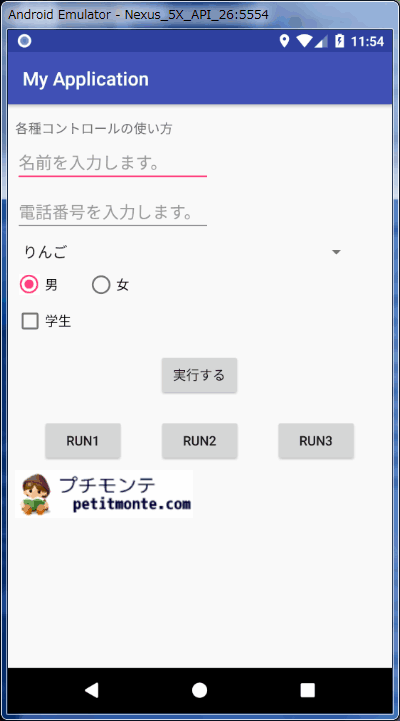
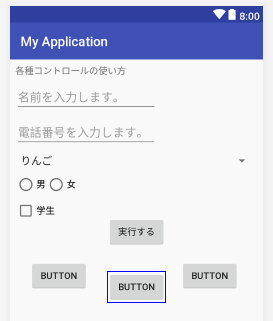
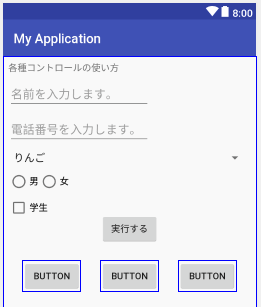
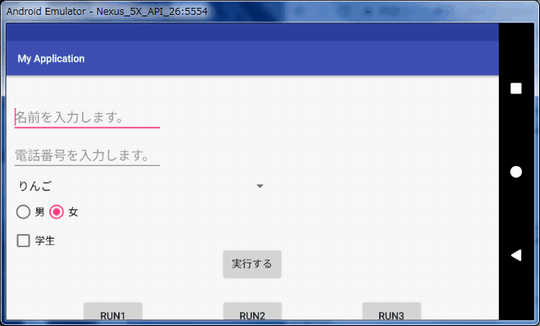
今回は標準的なコントロールであるTextView、Plain Text、Phone、Spinner、RadioButton/RadioGroup、CheckBox、Button、ImageViewの作成と3つのボタンをグループ化(チェーン)します。
それと、各イベント(ラムダ式含む)についても取り扱います。
今後、主流となるConstraintLayout(制約レイアウト)で画面設計を行います。ConstraintLayoutは各コントロールを相対的に配置できます。
Android StudioのインストールとHello Worldまでの一連の流れの記事から進んでいない方は、メニューの[ツール][SDKマネージャー]の「SDKツール」タブの「ConstraintLayout for Android」をオンにしてインストールして下さい。※その後にプロジェクトを新規に作成して下さい。
2. 各コントロールを配置する
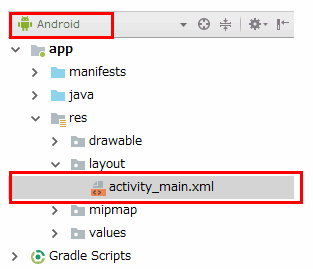
最初にAndroid Studioのres\layoutフォルダのレイアウトファイル(activity_main.xml)をダブルクリックします。次に画面下部にある「デザイン」「テキスト」タブの「デザイン」を選択します。
中央にある「Hello World!」のTextViewを選択して、キーボードのDeleteキーで削除します。これで画面上にはベース(土台)のConstraintLayoutのみとなります。
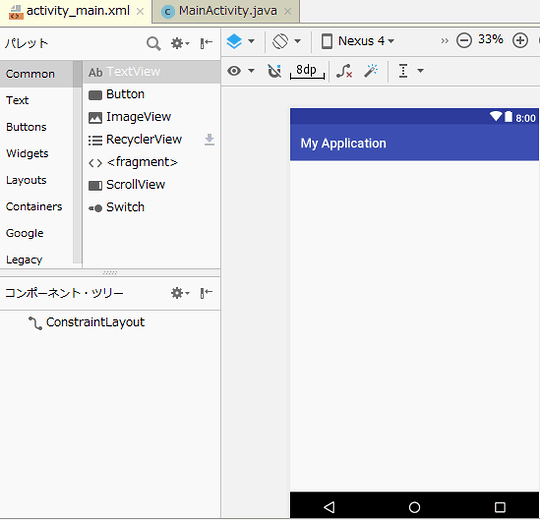
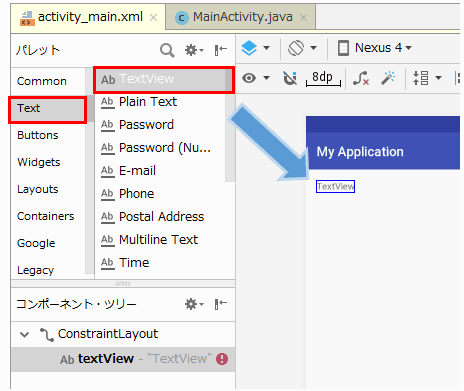
次に[Text][TextView]を画面にドロップします。
[Text][Plain Text]と[Text][Phone]も順番に貼り付けます。
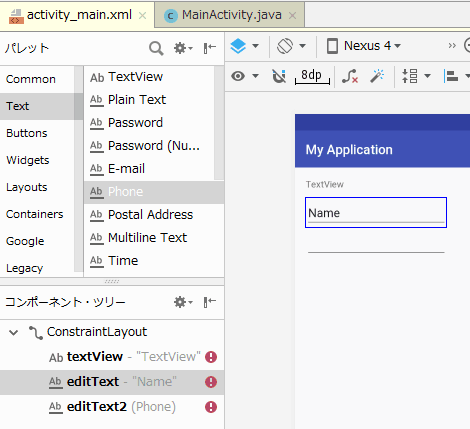
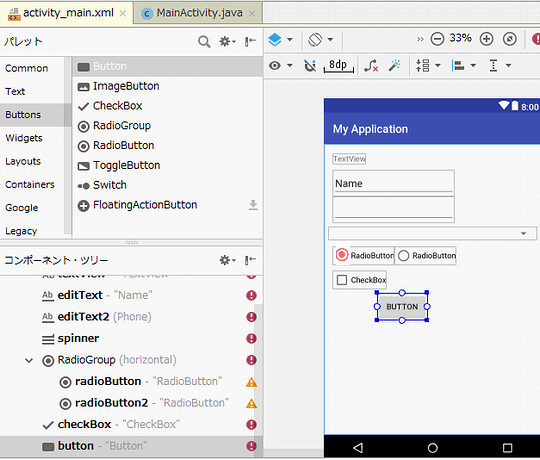
[Containers][Spinner]を1つ、[Buttons][RadioButton]を2つ貼り付けます。
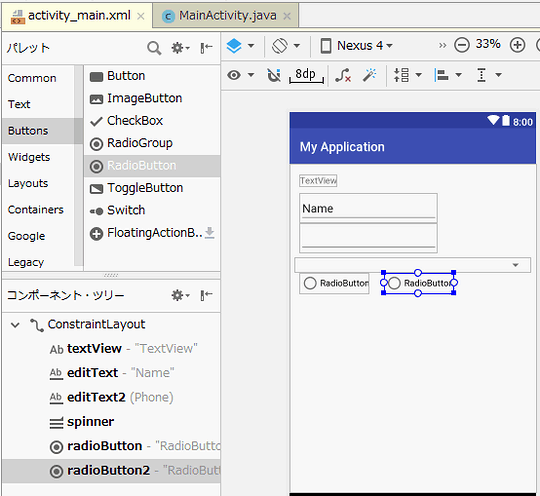
[Buttons][RadioGroup]をRadioButtonとRadioButtonの間ぐらいに設置します。次に左下の「コンポーネントツリー」にあるradioButtonをドロップしてRadioGroupの中に入れます。(2個とも図のようにする)
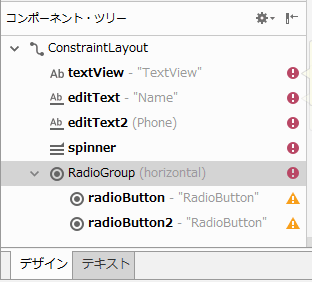
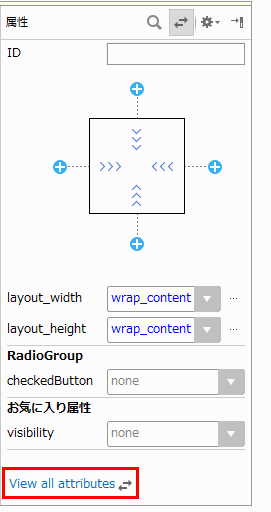
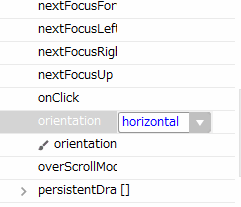
「コンポーネントツリー」のRadioGroupを選択します。そして、右側の属性の下部にある「View all attributes」をクリックします。
[orientation]を「horizontal」にします。
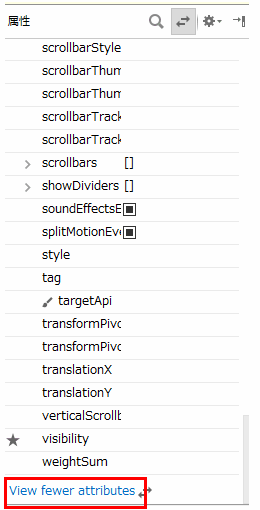
属性を下までスクロールして「View fewer attributes」を押して、前の画面に戻します。
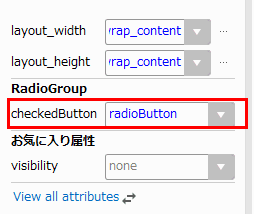
属性のRadioGroupのcheckedButtonを「radioButton」にする。
次に[Buttons][CheckBox]と[Buttons][Button]を画面にドロップします。
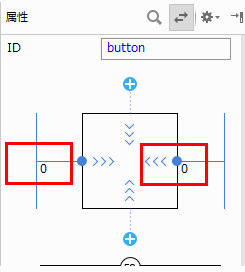
そのButtonを選択して、属性で左右を「0」にします。これでボタンが中央寄せされます。
いったん、ここでコントロールの配置を中断します。
3. レイアウトのエラーと警告
画面右上の矢印の部分をクリックします。
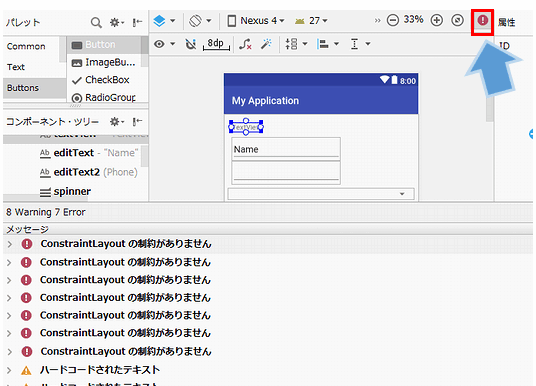
「ConstraintLayoutの制約がありません。」のエラーはコントロールのマージン(margin)が未設定の場合に発生します。「ハードコードされたテキスト」はコントロールに直接、文字列が設定されている時の警告です。
3-1. マージン(margin)を設定する
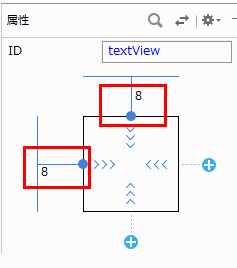
一番上のTextViewを選択します。属性にあるマージンを左8、上8にします。
同様にPlain Text、Phone、Spinner、RadioGroup、CheckBoxのコントロールのマージンを順番に設定します。
RadioButtonは設定できないので親コントロールのRadioGroupで設定します。また、RadioGroupは画面上で選択できないので左下の「コンポーネントツリー」で選択します。
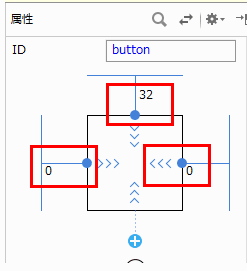
Buttonは次のように設定します。
これで、マージン未設定のエラーは消えています。
3-2. 文字列をリソースで定義して使用する
次に「ハードコードされたテキスト」の警告に対応します。
strings.xmlを選択します。

次のコードに置き換えてください。※各文字列を定義しています。
<resources>
<string name="app_name">My Application</string>
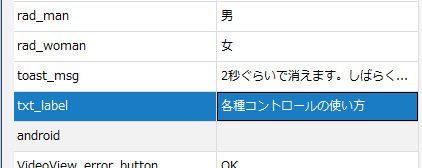
<string name="txt_label">各種コントロールの使い方</string>
<string name="hint_name">名前を入力します。</string>
<string name="hint_tel">電話番号を入力します。</string>
<string-array name="lst_spinner">
<item>りんご</item>
<item>みかん</item>
<item>メロン</item>
</string-array>
<string name="rad_man">男</string>
<string name="rad_woman">女</string>
<string name="chk_name">学生</string>
<string name="btn_click">実行する</string>
<string name="btn_run1">Run1</string>
<string name="btn_run2">Run2</string>
<string name="btn_run3">Run3</string>
<string name="img_des">イメージの説明</string>
<string name="toast_msg">3秒ぐらいで消えます。しばらくお待ち下さい。</string>
</resources>
そして、設計画面にあるtextViewを選択。右側にある「属性」のTextViewの上側のテキストの右横をクリックします。
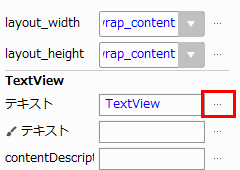
txt_labelを選択します。
editTextは属性のEditTextのhintにhint_nameを設定。TextViewのテキストを削除する。
editText2は属性のEditTextのhintにhint_telを設定。
spinnerは属性のSpinnerのentriesの配列からlst_spinnerを設定。
radioButtonは属性のTextViewの上側のテキストでrad_manを設定。
radioButton2は属性のTextViewの上側のテキストでrad_womanを設定。
checkBoxは属性のTextViewの上側のテキストでchk_nameを設定。
buttonは属性のTextViewの上側のテキストでbtn_clickを設定。
これで、全ての警告が消えます。
4. コントロールのグループ化(チェーン)
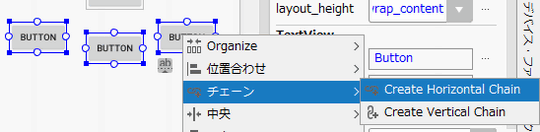
次に[Buttons][Button]を3つ横に並べます。真ん中はわざと少し下にずらして下さい。
Shiftキーを押しながら3つのボタンを選択します。そして、右クリック後に[チェーン][Create Horizontal Chain]を選択します。
再度、3つを選択。右クリックで[位置合わせ][Vertical Centers]を選択。
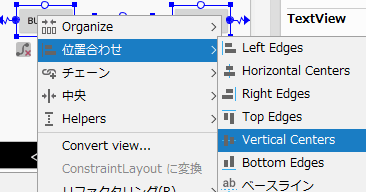
ボタンが綺麗に整列されましたね。
button2は属性のTextViewの上側のテキストでbtn_run1を設定。
button3は属性のTextViewの上側のテキストでbtn_run2を設定。
button4は属性のTextViewの上側のテキストでbtn_run3を設定。
※マージンのエラーが表示されている場合は、適当に設定してください。
5. 画像の追加
res\drawableに小さめの画像を2つ追加します。追加方法はAndroid Studioの基本をご覧下さい。
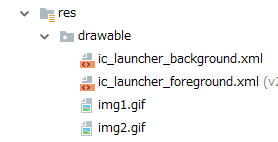
※ファイル名はimg1とimg2にします。PNG/JPGでもOKです。
[Widgets][ImageView]を画面にドロップします。(img1を選択)

マージンを設定後に、属性のImageViewのcontentDescriptionにimg_desを設定します。
これで画面設計は全て完了です。次はコーディングです。
・・・
コーディングに進む前に各コントロールのIDが次のようになっていない場合は、属性のIDで再設定して下さい。
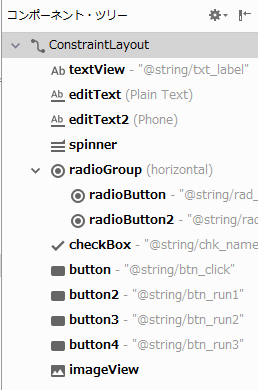
※IDが異なるとコンパイルエラーとなります。
6. ラムダ式に対応させる
今回のプロジェクトを「ラムダ式」のコーディングに対応させます。
[Gradle Scripts][build.gradle]を選択。次のコードを追加します。
  compileOptions {
    sourceCompatibility JavaVersion.VERSION_1_8
    targetCompatibility JavaVersion.VERSION_1_8
  }
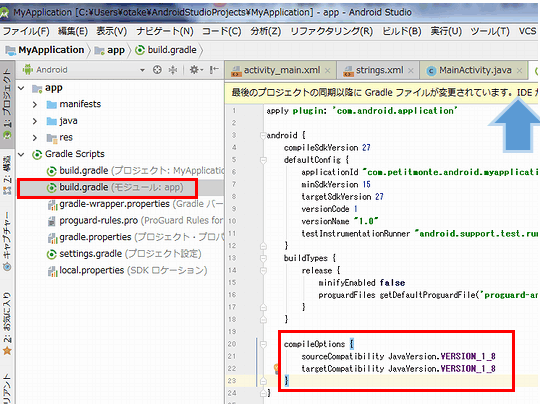
その後に、青矢印付近にある「今すぐ同期」をクリックします。
7. コーディング
「ボタンクリック、画像クリック、テキスト変更」のイベントから「アラートダイアログ、トースト」のメッセージや「エディットテキスト、スピナー、ラジオボタン、チェックボックス」の値を取得しています。
[MainActivity.java]
import android.support.v7.app.AlertDialog;
import android.support.v7.app.AppCompatActivity;
import android.os.Bundle;
import android.text.Editable;
import android.text.TextWatcher;
import android.view.View;
import android.widget.CheckBox;
import android.widget.EditText;
import android.widget.ImageView;
import android.widget.RadioButton;
import android.widget.RadioGroup;
import android.widget.Spinner;
import android.widget.TextView;
import android.widget.Toast;

public class MainActivity extends AppCompatActivity {

    // 画像の切り替えフラグ
    private boolean ImageFlg = false;

    // スピナーの選択アイテム名を取得する
    private String getSpinner(){
        Spinner sp = findViewById(R.id.spinner);
        return sp.getSelectedItem().toString();
    }

    // ラジオボタンの選択テキスト名を取得する
    private String getRadioButton(){
        RadioGroup rg = findViewById(R.id.radioGroup);
        return ((RadioButton)findViewById(rg.getCheckedRadioButtonId())).getText().toString();
    }

    // チェックボックスの値を取得する
    private String getCheckBox(){
        CheckBox ch = findViewById(R.id.checkBox);
        if (ch.isChecked())
            return "学生オン";
        else
            return "学生オフ";
    }

    // 3つのボタンイベント
    private class OnButtonClick implements View.OnClickListener{
        @Override
        public void onClick(View v) {
            String str = "";

            switch (v.getId()){
                case R.id.button2:
                    str = getResources().getString(R.string.btn_run1);
                    break;
                case R.id.button3:
                    str = getResources().getString(R.string.btn_run2);
                    break;
                case R.id.button4:
                    str = getResources().getString(R.string.btn_run3);
                    break;
            }

            // トースト
            str = str + "\n" + getResources().getString(R.string.toast_msg);
            Toast.makeText(MainActivity.this,  str, Toast.LENGTH_SHORT).show();
        }
    }

    @Override
    protected void onCreate(Bundle savedInstanceState) {

        // デフォルトの初期設定
        super.onCreate(savedInstanceState);
        setContentView(R.layout.activity_main);

        // EditTextとTextViewの連動
        EditText et = findViewById(R.id.editText);
        et.addTextChangedListener(new TextWatcher() {
            @Override
            public void beforeTextChanged(CharSequence s, int start, int count, int after) {
                 // テキスト変更前
            }

            @Override
            public void onTextChanged(CharSequence s, int start, int before, int count) {
                // テキスト変更中
            }

            @Override
            public void afterTextChanged(Editable s) {
                // テキスト変更後
                TextView lable = findViewById(R.id.textView);
                lable.setText(((EditText) findViewById(R.id.editText)).getText());
            }
        });

        // ボタンイベント(ラムダ式)
        findViewById(R.id.button).setOnClickListener(e->
                        new AlertDialog.Builder(MainActivity.this)

                // リソース
                .setTitle(getResources().getString(R.string.btn_click)+
                          "ボタンを押しました。\n\n")
                // スピナー/ラジオボタン/チェックボックス
                .setMessage(getSpinner() + "\n" + getRadioButton()+"\n" + getCheckBox())
                .setPositiveButton("OK", null)
                .show()
        );

        // ボタンイベント(3つのボタン)
        View.OnClickListener Events =  new OnButtonClick();
        findViewById(R.id.button2).setOnClickListener(Events);
        findViewById(R.id.button3).setOnClickListener(Events);
        findViewById(R.id.button4).setOnClickListener(Events);

        // 画像クリックイベント
        findViewById(R.id.imageView).setOnClickListener(new View.OnClickListener() {
            @Override
            public void onClick(View v) {
                ImageView iv = findViewById(R.id.imageView);

                // 画像を切り替えます。
                if (ImageFlg)
                    iv.setImageResource(R.drawable.img1);
                else
                    iv.setImageResource(R.drawable.img2);

                ImageFlg = !ImageFlg;
            }
        });
    }
}
後は実行するだけです。
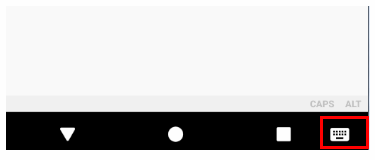
日本語入力は右下のアイコンで日本語に設定してください。
8. 画面をスクロールさせる
今回のケースですとスマートフォンを横画面にすると一部のコントロールが表示されません。
[縦]
[横]
自動でスクロールバーを表示するにはConstraintLayoutの上にScrollViewを配置します。さらにその上に各コントロールを配置する必要があります。
以上となります。1つの記事に詰め込み過ぎました :-)
関連記事

プチモンテ ※この記事を書いた人
 | |
| 💻 ITスキル・経験 サーバー構築からWebアプリケーション開発。IoTをはじめとする電子工作、ロボット、人工知能やスマホ/OSアプリまで分野問わず経験。 画像処理/音声処理/アニメーション、3Dゲーム、会計ソフト、PDF作成/編集、逆アセンブラ、EXE/DLLファイルの書き換えなどのアプリを公開。詳しくは自己紹介へ |
| 🎵 音楽制作 BGMは楽器(音源)さえあれば、何でも制作可能。歌モノは主にロック、バラード、ポップスを制作。歌詞は抒情詩、抒情的な楽曲が多い。楽曲制作は🔰2023年12月中旬 ~ | |
オリジナルゲームをつくってみました✨
Peasant Samurai ~ 百姓ノ持チタル国 (2026/8/3 公開予定)https://store.steampowered.com/app/4880700/Peasant_Samurai/
「民」が主役の幻想戦国RTS/街づくりゲーム