SQLiteによるデータベース操作(SELECT/INSERT/UPDATE/DELETE/トランザクション) [Android Studio]
Androidアプリが標準で利用できる「SQLite」によるデータベース操作です。データベースの作成、接続、テーブルの検索/更新/削除、トランザクションのサンプルをご紹介します。
目次
1. DEMO
今回はログキャットでSQLのSELECT文の結果を表示します。
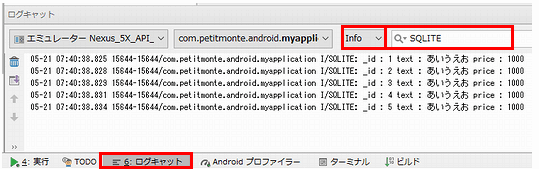
※ログの種類は「Info」、検索は「SQLITE」にして下さい。
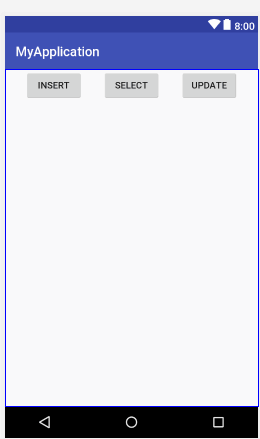
2. 画面設計
Buuttonを3つ配置します。
<?xml version="1.0" encoding="utf-8"?>
<android.support.constraint.ConstraintLayout xmlns:android="http://schemas.android.com/apk/res/android"
    xmlns:app="http://schemas.android.com/apk/res-auto"
    xmlns:tools="http://schemas.android.com/tools"
    android:layout_width="match_parent"
    android:layout_height="match_parent"
    tools:context=".MainActivity">

    <Button
        android:id="@+id/button"
        android:layout_width="wrap_content"
        android:layout_height="wrap_content"
        android:text="INSERT"
        app:layout_constraintEnd_toEndOf="parent"
        app:layout_constraintEnd_toStartOf="@+id/button2"
        app:layout_constraintHorizontal_bias="0.5"
        app:layout_constraintStart_toStartOf="parent"
        app:layout_constraintTop_toTopOf="parent" />

    <Button
        android:id="@+id/button2"
        android:layout_width="wrap_content"
        android:layout_height="wrap_content"
        android:text="SELECT"
        app:layout_constraintEnd_toStartOf="@+id/button3"
        app:layout_constraintHorizontal_bias="0.5"
        app:layout_constraintStart_toEndOf="@+id/button"
        app:layout_constraintTop_toTopOf="parent" />

    <Button
        android:id="@+id/button3"
        android:layout_width="wrap_content"
        android:layout_height="wrap_content"
        android:text="UPDATE"
        app:layout_constraintEnd_toEndOf="parent"
        app:layout_constraintHorizontal_bias="0.5"
        app:layout_constraintStart_toEndOf="@+id/button2"
        app:layout_constraintTop_toTopOf="parent" />

</android.support.constraint.ConstraintLayout>
3. コーディング
SQLiteOpenHelperを継承したヘルパークラスで「DB接続」を行います。接続にはデータベース名(ファイル名)、バージョンの定義が必要です。また、ユーザーID、パスワードなどは必要ありません。
テーブルなどの操作はSQLiteDatabaseクラスを使用しています。
import android.content.Context;
import android.database.Cursor;
import android.database.sqlite.SQLiteDatabase;
import android.database.sqlite.SQLiteOpenHelper;
import android.database.sqlite.SQLiteStatement;
import android.support.v7.app.AppCompatActivity;
import android.os.Bundle;
import android.util.Log;
import android.view.View;

public class MainActivity extends AppCompatActivity {

    static final String DB_NAME = "sample.db";
    static final int DB_VERSION = 1;

    // データベースの接続操作を行うヘルパークラス
    private static class MySQLiteOpenHelper extends SQLiteOpenHelper {

        // コンストラクタ
        public MySQLiteOpenHelper(Context context){
           super(context, DB_NAME, null, DB_VERSION);
        }

        // データベースが存在しない場合に一度だけ呼ばれる
        @Override
        public void onCreate(SQLiteDatabase db) {
            db.execSQL("CREATE TABLE mst_sample (" +
                       // 主キー(自動採番) ※Androidでは主キーは _id とする
                       "_id INTEGER PRIMARY KEY AUTOINCREMENT, "+
                       "title TEXT," +
                       "price INTEGER NOT NULL);");
        }

        // DB_VERSIONが異なる場合に自動で実行される
        // ※アプリのバージョンアップなどでテーブル定義を変更する場合は
        // ※DB_VERSIONのバージョンを変更するとこのメソッドが呼ばれます。
        @Override
        public void onUpgrade(SQLiteDatabase db, int oldVersion, int newVersion) {
            db.execSQL("DROP TABLE mst_sample;");
            onCreate(db);
        }
    }

   @Override
    protected void onCreate(Bundle savedInstanceState) {
        super.onCreate(savedInstanceState);
        setContentView(R.layout.activity_main);

        // INSERT
        findViewById(R.id.button).setOnClickListener(new View.OnClickListener() {
            @Override
            public void onClick(View v) {
                SQLiteDatabase db = null;

                MySQLiteOpenHelper helper = new MySQLiteOpenHelper(MainActivity.this);
                try {
                    db = helper.getWritableDatabase();

                    // トランザクションの開始
                    db.beginTransaction();

                    // プリペアドステートメント
                    SQLiteStatement stmt = db.compileStatement(
                                        "INSERT INTO mst_sample(title,price) VALUES(?,?)");
                    stmt.bindString(1,"あいうえお");
                    stmt.bindLong(2,1000);

                    // SQLの実行
                    stmt.executeInsert();

                    // コミット
                    db.setTransactionSuccessful();
                }catch (Exception e){
                    // エラー時(ロールバックは必要ありません。)
                }finally{
                    if(db != null) {
                        db.endTransaction();
                        db.close();
                    }
                }
            }
        });

        // SELECT
        findViewById(R.id.button2).setOnClickListener(new View.OnClickListener() {
            @Override
            public void onClick(View v) {
               SQLiteDatabase db = null;

               MySQLiteOpenHelper helper = new MySQLiteOpenHelper(MainActivity.this);
               try {
                   db = helper.getReadableDatabase();

                   Cursor cursor = db.rawQuery("SELECT * FROM mst_sample;",null);

                   // 行毎にデータを読み込む
                   while(cursor.moveToNext()){

                       int index = cursor.getColumnIndex("_id");
                       String _id = String.valueOf(cursor.getLong(index));

                       index = cursor.getColumnIndex("title");
                       String title = cursor.getString(index);

                       index = cursor.getColumnIndex("price");
                       String price = String.valueOf(cursor.getLong(index));

                       // ログに出力する(Android Studioの下部にあるログキャットで確認可能)
                       Log.i("SQLITE", "_id : " + _id + " " +
                                                       "text : " + title + " " +
                                                       "price : "+ price);
                   }
                 }finally{
                   if(db != null) {
                       db.close();
                   }
               }
           }
        });

       // UPDATE
       findViewById(R.id.button3).setOnClickListener(new View.OnClickListener() {
           @Override
           public void onClick(View v) {
               SQLiteDatabase db = null;

               MySQLiteOpenHelper helper = new MySQLiteOpenHelper(MainActivity.this);
               try {
                   db = helper.getWritableDatabase();

                   // トランザクションの開始
                   db.beginTransaction();

                   // プリペアドステートメント
                   SQLiteStatement stmt = db.compileStatement(
                           "UPDATE mst_sample SET title='かきくけこ' WHERE title=?");

                   stmt.bindString(1, "あいうえお");

                   // SQLの実行
                   stmt.executeUpdateDelete();

                   // コミット
                   db.setTransactionSuccessful();

               }catch (Exception e){
                  // エラー時(ロールバックは必要ありません。)
               }finally{
                   if(db != null) {
                       db.endTransaction();
                       db.close();
                   }
               }
           }
       });
   }
}
今回のテーブル操作はSELECT/INSERT/UPDATEです。更新系にはプリペアドステートメント及びトランザクションを使用しています。
※DELETEはUPDATEの手法と同様です。
スポンサーリンク
関連記事
公開日:2018年05月21日

記事NO:02661
プチモンテ ※この記事を書いた人
 | |
| 💻 ITスキル・経験 サーバー構築からWebアプリケーション開発。IoTをはじめとする電子工作、ロボット、人工知能やスマホ/OSアプリまで分野問わず経験。 画像処理/音声処理/アニメーション、3Dゲーム、会計ソフト、PDF作成/編集、逆アセンブラ、EXE/DLLファイルの書き換えなどのアプリを公開。詳しくは自己紹介へ |
| 🎵 音楽制作 BGMは楽器(音源)さえあれば、何でも制作可能。歌モノは主にロック、バラード、ポップスを制作。歌詞は抒情詩、抒情的な楽曲が多い。楽曲制作は🔰2023年12月中旬 ~ | |