Vue Routerの使い方 [Rails]
作るもの


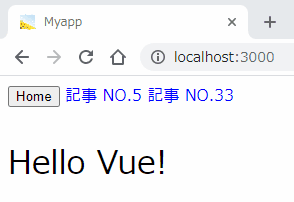
今回、作成するサンプルのVue Routerのモードは「history」です。
サーバー側の設定はRuby on Railsのroutes.rbで行います。サーバー設定を行いたくない方はRouterのmodeを「hash」にして下さい。
1. プロジェクトの作成
cd ~/
mkdir myapp
cd myapp
rails new . --webpack=vue --skip-turbolinks --skip-action-mailer --skip-action-mailbox --skip-active-storage --skip-test -d mysql
2. Vue Routerのインストール
yarn add vue-router
3. コントローラー/ビューの作成
bin/rails g controller pages index
4. Vue.js関連のファイル
ファイル構成
app/javascript/app.vue
app/javascript/router.js
app/javascript/components/article.vue
app/javascript/components/home.vue
app/javascript/packs/hello_vue.js
app/javascript/app.vue
<template>
  <div>
    <div>
      <router-link to="/" tag="button">Home</router-link>
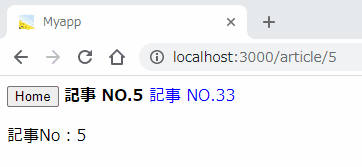
      <router-link to="/article/5">記事 NO.5</router-link>
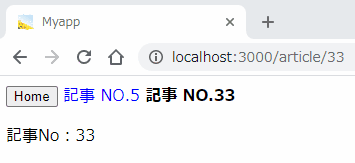
      <router-link to="/article/33">記事 NO.33</router-link>
    </div>
    <!-- router-viewにコンポーネントが描画される -->
    <router-view/>
  </div>
</template>

<script>
</script>

<style scoped>
a {
  color: blue;
  text-decoration: none;
}

/* リンクがアクティブになっているときに適用 */
a.router-link-exact-active {
  color: black;
  font-weight: bold;
}
</style>
app/javascript/router.js
import Vue from 'vue'
import Router from 'vue-router'
import Home from './components/home.vue'

Vue.use(Router)

export default new Router({

  // modeのデフォルトは「hashモード」です。
  mode: 'history',

  // 1. hashモード
  // routes.rbの設定は不要です。

  // [URLの例]
  // http://localhost:3000/#/
  // http://localhost:3000/#/article/5
  // http://localhost:3000/#/article/33

  // 2. historyモード
  // routes.rbの設定が必要です。

  // [URLの例]
  // http://localhost:3000/
  // http://localhost:3000/article/5
  // http://localhost:3000/article/33

  // 3. abstractモード
  // 詳細は公式サイトへ https://router.vuejs.org/ja/api/#mode

  // アプリのベースURL
  base: process.env.BASE_URL,

  // ルーターの設定
  routes: [
    {
      path: '/',
      name: 'Home',

      // 同期でコンポーネントを呼び出す
      component: Home
    },
    {
      path: '/article/:id',
      name: 'Article',

      // 非同期でコンポーネントを呼び出す
      // ※Homeのようにimportしたコンポーネントを設定するのでも可
      component: () => import('./components/article.vue')
    },
  ]

})
app/javascript/components/article.vue
<template>
  <p>記事No:{{ id }}</p>
</template>

<script>
export default {
  name: 'Article',
  data () {
    return {
      id: 0
    }
  },

  created() {
    this.id = this.$route.params.id
  },

  // $routeが変更されたときにidを再設定する
  watch: {
    '$route'(to, from) {
      this.id = to.params.id
    }
  }
}
</script>

<style scoped>
</style>
app/javascript/components/home.vue
<template>
  <p>{{ message }}</p>
</template>

<script>
export default {
  name: 'home',
  data: function () {
    return {
      message: "Hello Vue!"
    }
  }
}
</script>

<style scoped>
p {
  font-size: 2em;
}
</style>
app/javascript/packs/hello_vue.js
import Vue from 'vue'
import App from '../app.vue'
import router from '../router.js'

document.addEventListener('DOMContentLoaded', () => {

  const app = new Vue({
    router: router,
    render: h => h(App)
  }).$mount()

  document.getElementById('root').appendChild(app.$el)
})
5. Rails関連のファイル
app/views/layouts/application.html.erb
<!DOCTYPE html>
<html>
  <head>
    <title>Myapp</title>
    <%= csrf_meta_tags %>
    <%= csp_meta_tag %>
    <%= stylesheet_link_tag 'application', media: 'all' %>
    <%= javascript_pack_tag 'application' %>
    <%= javascript_pack_tag 'hello_vue' %>
  </head>

  <body>
    <%= yield %>
  </body>
</html>
app/views/pages/index.html.erb
<div id="root"></div>
config/database.yml
database、username、passwordを設定する。未設定でログインできない場合は「Access denied for user 'root'@'localhost' (using password: NO)」のエラーとなる。
config/routes.rb
Rails.application.routes.draw do
  get 'pages/index'
  root to: 'pages#index'

  # Routerのmodeがhashの場合は不要です
  get '/article/:id', to: 'pages#index'
end
6. 実行する
参考URL
API リファレンス (Vue Router公式)
スポンサーリンク
関連記事
公開日:2020年06月21日
記事NO:02833
プチモンテ ※この記事を書いた人
 | |
 | 💻 ITスキル・経験 サーバー構築からWebアプリケーション開発。IoTをはじめとする電子工作、ロボット、人工知能やスマホ/OSアプリまで分野問わず経験。 画像処理/音声処理/アニメーション、3Dゲーム、会計ソフト、PDF作成/編集、逆アセンブラ、EXE/DLLファイルの書き換えなどのアプリを公開。詳しくは自己紹介へ |
| 🎵 音楽制作 BGMは楽器(音源)さえあれば、何でも制作可能。歌モノは主にロック、バラード、ポップスを制作。歌詞は抒情詩、抒情的な楽曲が多い。楽曲制作は🔰2023年12月中旬 ~ | |


