Javaの手書きSwing/JavaFXでGUIアプリケーション [Hello World !]
目次
1. 事前準備
1-1. JavaFXのアクセス制限
1-2. JavaFXのエラーの解決方法
2. Swing
3. JavaFX
1. 事前準備
現在(2018/5/10)のPleiades(Eclipse)ではJava8を標準で使用しています。
JavaFXのアクセス制限
Swingは問題ないのですが、JavaFXのAPIをJava8で使用すると「アクセス制限: The type 'Application' is not API (restriction on required library 'C:\Pleiades\java\8\jre\lib\ext\jfxrt.jar')」などのエラーが発生します。
※JavaFX関連のコードが真っ赤の波線でエラーとなります。
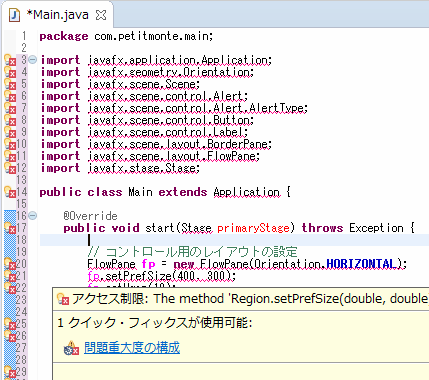
Java8ではJavaFXのAPIは非推奨(禁止)なのが原因です。
JavaFXのエラーの解決方法
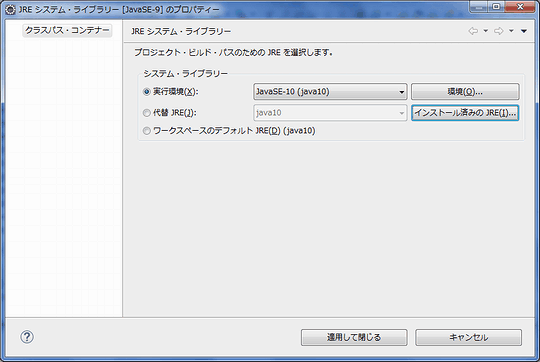
Eclipseでエラーを回避するには使用するJavaをJava9以上にします。
パッケージ・エクスプローラーの「JREシステム・ライブラリ」の上で右クリックで「プロパティ」を押します。 次に「実行環境」をJava9以上に設定します。また、「代替JRE」も同じバージョンにして下さい。(次例では10)
これでエラーは出ませんが、今度はAPIの解説が「英語」になります。
各APIの解説を日本語にするにはパッケージ・エクスプローラーの「JREシステム・ライブラリ」の中にある「java.base」の上で右クリックして「プロパティ」を押します。
「Javadocロケーション」を選択して「Javadocロケーション・パス」に
を入力して適用します。
※現時点のAPIの日本語版はJava9迄です。(公式ドキュメントの一覧)
※うまく反映されない場合は、Eclipseを再起動して下さい。
これで事前準備は完了です。
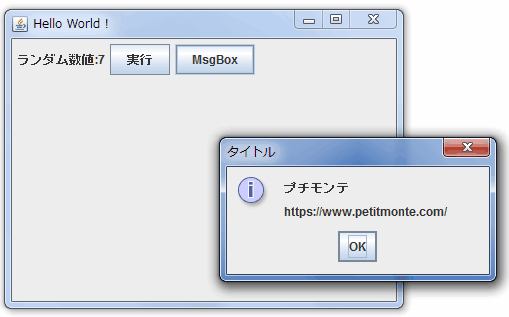
2. Swing
今回のGUI版の「Hello World !」の例では実行ボタンを押すと、ラベルにランダムな数値が表示されます。また、MsgBoxを押すとメッセージボックスが表示されます。
import java.awt.FlowLayout;
import java.awt.event.ActionEvent;
import java.awt.event.ActionListener;

import javax.swing.JButton;
import javax.swing.JFrame;
import javax.swing.JLabel;
import javax.swing.JOptionPane;

public class Main extends JFrame {

   private JLabel  label1   = null;
   private JButton button1  = null;
   private JButton button2  = null;

   // イベント
   class OnButton1_Click implements ActionListener {
       public void actionPerformed(ActionEvent e) {

           Integer val = new java.util.Random().nextInt(10);
           label1.setText("ランダム数値:" + val.toString());
       }
   }

   class OnButton2_Click implements ActionListener {
       public void actionPerformed(ActionEvent e) {
           JOptionPane
             .showMessageDialog(null,
                "プチモンテ\r\nhttps://www.petitmonte.com/", "タイトル",
                JOptionPane.INFORMATION_MESSAGE);
       }
    }

    // メインメソッド
    public static void main(String [] args) {
        new Main();
    }

    // コンストラクタ
    public Main(){

        // --------------------------
        //  ウインドウの生成
        // --------------------------

        // コントロールのレイアウト(左揃え)を設定する
        getContentPane().setLayout(new FlowLayout(FlowLayout.LEFT));

        // ウインドウが閉じられる時、アプリケーションを終了する
        setDefaultCloseOperation(JFrame.EXIT_ON_CLOSE);

        // ウインドウタイトルの設定
        setTitle("Hello World !");

        // ウインドウサイズの設定
        setSize(400, 300);

        // ウインドウを表示する
        setVisible(true);

        // --------------------------
        //  コントロールの生成
        // --------------------------

        // コントロール(ラベル)の作成
        this.label1 = new JLabel("");
        // ウインドウにコントロールを登録する
        getContentPane().add(this.label1);

        // コントロール(ボタン)の作成
        this.button1 = new JButton("実行");
        getContentPane().add(this.button1);

        // リスナー(イベント)にコントロールを登録する
        this.button1.addActionListener(new OnButton1_Click());

        // コントロール(ボタン)の作成
        this.button2 = new JButton("MsgBox");
        this.button2.addActionListener(new OnButton2_Click());
        getContentPane().add(this.button2);

    }
}
その他のコントロールはとほほのJava入門(外部サイト)をご覧下さい。
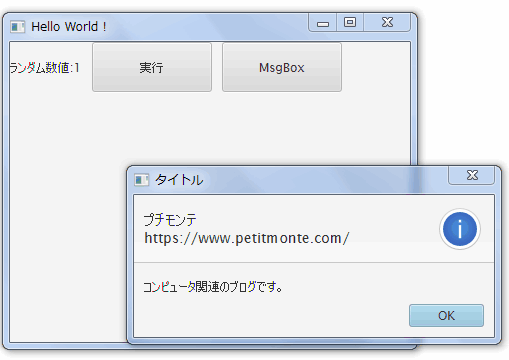
3. JavaFX
動作はSwingと同様です。
import javafx.application.Application;
import javafx.geometry.Orientation;
import javafx.scene.Scene;
import javafx.scene.control.Alert;
import javafx.scene.control.Alert.AlertType;
import javafx.scene.control.Button;
import javafx.scene.control.Label;
import javafx.scene.layout.BorderPane;
import javafx.scene.layout.FlowPane;
import javafx.stage.Stage;

public class Main extends Application {

    @Override
    public void start(Stage primaryStage) throws Exception {

        // コントロール用のレイアウトの設定
        FlowPane fp = new FlowPane(Orientation.HORIZONTAL);
        fp.setPrefSize(400, 300);
        fp.setHgap(10);

        // ラベルの生成
        Label label1 = new Label("");
        fp.getChildren().add(label1);

        // ボタンの生成
        Button button1 = new Button("実行");
        button1.setPrefSize(120, 50);
        fp.getChildren().add(button1);
        button1.setOnAction(e->label1.setText("ランダム数値:" +
                                new java.util.Random().nextInt(10))
                            );

        // メッセージボックスの生成
        Alert alert = new Alert(AlertType.INFORMATION);
        alert.setTitle("タイトル");
        alert.setHeaderText("プチモンテ\r\nhttps://www.petitmonte.com/");
        alert.setContentText("コンピュータ関連のブログです。");

        // ボタンの生成
        Button button2 = new Button("MsgBox");
        button2.setPrefSize(120, 50);
        fp.getChildren().add(button2);
        button2.setOnAction(e-> alert.show());

        // レイアウト関連
        BorderPane bp = new BorderPane();
        bp.setPrefSize(400, 300);
        bp.setCenter(fp);
        Scene scene = new Scene(bp, 400, 300);
        primaryStage.setTitle("Hello World !");
        primaryStage.setScene(scene);
        primaryStage.show();
    }
}
最後に
開発環境のウインドウにボタンやラベルなどをペタペタ貼って画面設計をするRAD(Rapid Application Development)は次を参考にして下さい。
| Swing | Window Builder |
|---|---|
| JavaFX | Scene Builder |
※いずれも、Eclipseと連携可能です。
これらを使用すると手書きのSwing、JavaFXよりは効率が良いです。
ただし、JavaであるがゆえにDelphiやLazarusuのような「本格的なRAD」よりは開発効率が落ちます。Delphiは有償でLazarusuは無償です。どちらもクロスプラットフォームでランタイム不要でJavaより高速に動作します。
※その他にC#やVBの.NETという方法もあります。
関連記事
| 前の記事: | Javaのスレッドで並列処理を行う |
| 次の記事: | Android Studioの使い方 |

プチモンテ ※この記事を書いた人
 | |
| 💻 ITスキル・経験 サーバー構築からWebアプリケーション開発。IoTをはじめとする電子工作、ロボット、人工知能やスマホ/OSアプリまで分野問わず経験。 画像処理/音声処理/アニメーション、3Dゲーム、会計ソフト、PDF作成/編集、逆アセンブラ、EXE/DLLファイルの書き換えなどのアプリを公開。詳しくは自己紹介へ |
| 🎵 音楽制作 BGMは楽器(音源)さえあれば、何でも制作可能。歌モノは主にロック、バラード、ポップスを制作。歌詞は抒情詩、抒情的な楽曲が多い。楽曲制作は🔰2023年12月中旬 ~ | |